Author(s): Jeevan S Ladi*, Krutika J Ladi, Nitant A Shah and Ujwala M Gaikwad
There is no standard technique of lenticule separation in Refractive Lenticule Extraction (ReLEx) or Small Incision Lenticule Extraction (SMILE) procedure used for spectacle number treatment by Laser. We present a unique method of lenticule dissection using reverse pull by shearing applied force extraction (SAFE) to ensure complete removal of the lenticule with minimal postoperative inflammation. This technique keeps the lenticule under control of the operating surgeon throughout the dissection. Random separation of lenticule may leave a part of the lenticule attached to the periphery. Separated lenticule overrides the attached part of lenticule. This reduced visibility of the attached part makes further separation difficult and causes excessive manipulation, consumes more time, leads to inflammation and may cause incomplete lenticule removal. This new technique ensures safe and full removal of the lenticule irrespective of its thickness (thin lenticule is difficult to identify and separate while thick lenticule tends to get accumulated on one side) and improves postoperative outcome.
Small incision lenticule extraction has become a prominent component in refractive surgery modalities in a short time since its introduction [1]. However, there is no standard technique of lenticule separation in Refractive Lenticule Extraction (trade name - ReLEx) or Small Incision Lenticule Extraction (SMILE) procedure after it was described in 2011 [2,3]. Many techniques have been suggested by different surgeons [4-7]. Common problems associated with ReLEx SMILE lenticule separation are false passage, failure to identify the posterior dissection plane, dissecting in a posterior plane (instead of anterior) causing the lenticule to stick to the top cap, tearing and partial removal of lenticule, loss of entire lenticule away from the wound, cutting through or abrasion at the incision, excess dissection leading to keratitis, postoperative haziness of the cornea leading to delayed visual recovery etc [8]. We present a unique method of lenticule dissection which will ensure 360 degrees complete removal of the lenticule with minimal postoperative inflammation.
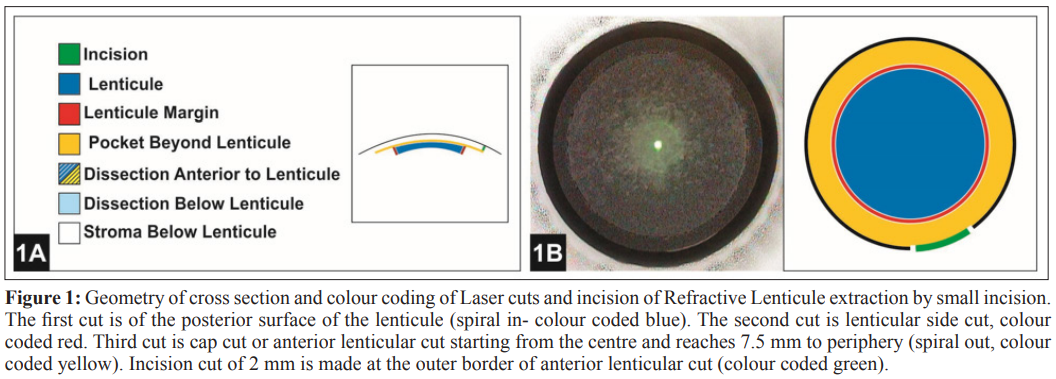
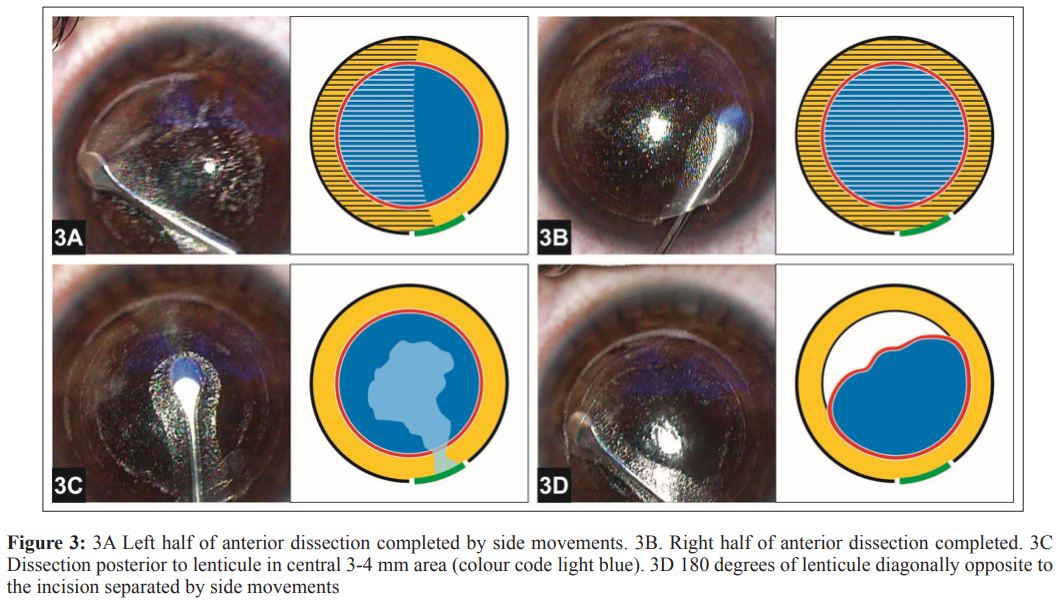
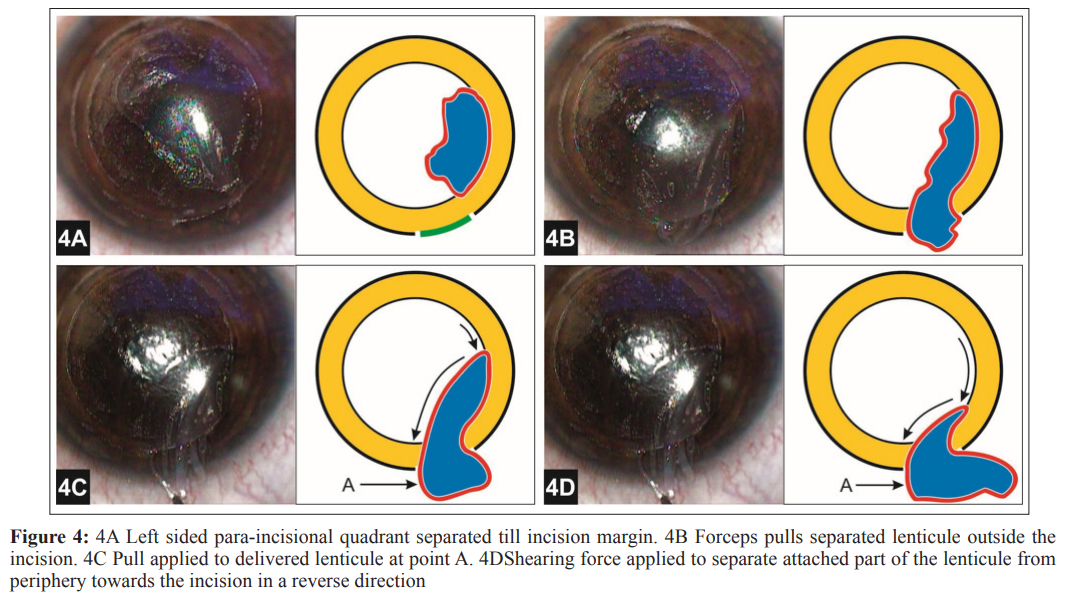
For all patients, the cap thickness is kept as 100 microns. In all cases we place a 2 mm incision at 110 degrees. Uniform lenticule size of 6.5 mm and cap of 7.5 mm diameter was used in all patients. The lenticule is created by the Femtosecond laser in 4 steps (lenticule is colour coded dark blue in the illustrated figures). First the laser cuts the posterior surface of the lenticule, second-vertical 360degree side cut, third - anterior part of the lenticule (cap) and fourth - incision of desired size and location to remove the lenticule (Figure 1). Dissection is performed under high magnification (1.6X) for better tissue plane identification and separation of lenticule. The sharp end of the Channsui Dissector is introduced in the left half of the incision and lifted gently to enter above the lenticule margin (Figure 2A). About 1 mm area above lenticule is dissected to separate it from top cap. The dissector is next introduced into right half of the incision for dissection posterior to lenticule (Figure 2B). Before crossing white margin of lenticule, the stroma is depressed. This ensures entry into correct plane of dissection posterior to the lenticule. The dissector is moved in a sideways fashion (windshield viper) to create posterior dissection pocket of about 1 mm. This keeps both the anterior and posterior dissected pockets apart from each other. This initial dissection anterior and posterior to the lenticule helps in further separation of the lenticular disc. The other end of the dissector is blunt and spoon shaped. The blunt side is introduced in the left side of the wound, directing the spoon head obliquely to the left side for anterior dissection plane and to remain away from right-sided posterior dissection plane (figure 2C). Before crossing white margin of the lenticule, blunt dissector is lifted to go over the lenticule margin. This avoids accidental entry posterior to the lenticule. Once correct entry into anterior pocket between lenticule and top cap is ensured, the blunt dissector is advanced to opposite side of the incision using side movements, till end of the pocket is reached (Figure 2D). Once opposite end of incision is reached; about 30 degrees of area is dissected. This creates a path from the wound to the opposite end. Dissection of anterior plane is completed by side movements of spatula to the right and left side. Left side of the anterior pocket is dissected first (Figure 3A). Then right side of the anterior dissection is completed (figure 3B). Throughout dissection of the anterior pocket (blue and yellow shaded area in figure), the instrument is pressed against top part of the lenticule to have minimal manipulation of stroma above lenticule. This also helps to prevent inflammation. The dissector is removed out of the wound. For dissection posterior to the lenticule, blunt spoon shaped dissector is placed to right side of wound just short of the margin of the lenticule. The dissector is pressed down just before the lenticule margin to enter into the initially dissected posterior plane. Posterior pocket dissection in central 3-4 mm area is carried out (light blue area in figure) with right and left semi- circular movements (Figure 3C). The lenticule at periphery is then broken by dissector to opposite side of the wound by reaching end of outer pocket (yellow area in figure). Approximately 180 degrees of lenticule opposite to the incision is separated by side movements (Figure 3D). Left sided para-incisional quadrant is then separated till incision margin (Figure 4A). This creates a free lenticule of about 270 degrees (3 quadrants) with about 90 degrees (1 Quadrant) lenticule still remaining attached to the right sided para-incisional area. While dissecting, the instrument is pressed on posterior part of lenticule with minimal manipulation of stroma posterior to lenticule. This step of lenticule pressurized dissection, similar to anterior dissection, helps to reduce tissue handling and inflammation. Forceps is now introduced to pull the separated lenticule outside the wound (Figure 4B). The separated lenticule has two attachments; one away from the incision and one next to the incision. Part of the lenticule attached away from wound (left side of delivered lenticule outside the incision) is pulled with forceps (point A in Figure 4C). This separate attached quadrant from the periphery towards the incision in a reverse direction using a Shearing Applied Force Extraction (SAFE), ensuring 360-degree removal of lenticule (Figure 4D). A pull on the attached quadrant next to the incision side (right part of lenticule delivered out of incision) is avoided; as it may lead to stretching of the lenticule causing partial removal. Keeping the para incisional quadrant till the very end ensures controlled removal of lenticule. Separation of 180 degrees of lenticule opposite to the incision ensures this separated part coming close to incision and avoids loss of lenticule away from the incision. Reverse shearing is a controlled force (SAFE) which separates the lenticule completely without a direct pull and thus avoids residual fragments of the lenticule.

We operated 120 eyes of 60 patients using the above technique from May 2017 to February 2018 with 6 months completed follow up. 22 eyes had myopia ranging from -0.5 D to -10.25 D. 98 eyes had myopia with astigmatism, cylinder ranged from -0.25D to -3.25 D. No intra-operative complications were encountered in any of the eyes. At 6 months the uncorrected vision was 20/20 in 117 eyes and 20/30 in 3 eyes.
Random separation of lenticule may leave a part of the lenticule attached to the periphery. Separated lenticule overrides the attached part of lenticule. This reduced visibility of the attached part makes further separation difficult and causes excessive manipulation, consumes more time, leads to inflammation and may cause incomplete lenticule removal. This new technique ensures safe and full removal of the lenticule irrespective of its thickness (thin lenticule is difficult to identify and separate while thick lenticule tends to get accumulated on one side) and improves postoperative outcome.
1.Moshirfar M, Mc Caughey MV, Reinstein DZ, Shah R, Santiago Caban L, et al. (2015) Small-incision lenticule extraction. J Cataract Refract Surg 41: 652-665.
2.Shah R, Shah S, Sengupta S (2011) Results of small incision lenticule extraction: All-in-one femtosecond laser refractive surgery. J Cataract Refract Surg 37: 127-137.
3.Sekundo W, Kunert KS, Blum M (2011) Small incision corneal refractive surgery using the small incision lenticule extraction (SMILE) procedure for the correction of myopia and myopic astigmatism: results of a 6month prospective study. Br J Ophthalmol 95: 335-339.
4.Ang M, Mehta JS, Chan C, Htoon HM, Koh JC, et al. (2014) Refractive lenticule extraction: Transition and comparison of 3 surgical techniques. J Cataract Refract Surg 40: 1415-1424.
5.Abdelmonem Hamed, Ahmed Fekry (2016) Refractive small incision lenticule extraction: Push-up and push-down techniques. J Cataract Refract Surg 42: 1713-1715.
6.Jacob S, Agarwal A, Mazzotta C, Agarwal A, Raj JM (2017) Sequential segmental terminal lenticular side-cut dissection for safe and effective small-incision lenticule extraction in thin lenticules. J Cataract Refract Surg 43: 443-448.
7.Sharma N, Urkude J, Chaniyara M, Titiyal JS (2017) Microscope-integrated intraoperative optical coherence tomography-guided small incision lenticule extraction: New surgical technique J Cataract Refract Surg 43: 1245-1250.
8.Wang Y, Ma J, Zhang J, Dou R, Zhang H, et al. (2017) Incidence and management of intraoperative complications during small-incision lenticule extraction in 3004 cases. J Cataract Refract Surg 43: 796-802.
View PDF