Author(s): Rajesh Azmeera
SAP Supply Chain Management is one of the key modules in SAP ERP and controls Production Planning, business forecasting and demand planning. It helps the organization to manage their supply chain process in a dynamic environment. SAP SCM is a complete software to cover key processes such as supply chain networking, supply chain planning and coordination, and supply chain execution.
Demand planning integration we now offer an integration of key figures from SAP Integrated Business Planning (SAP IBP) into the new flexible constraint framework available in SAP S/4HANA Production Planning and Detailed Scheduling (PP/DS). Will detail all the steps in Demand Planning. The purpose of this article is to describe the general configuration steps required to manually set up the configuration within the system landscape that has already been installed using the corresponding installation or configuration guides for installation.
This article supplements the existing Customizing documentation in the Implementation Guide (IMG) and provides additional information where required
Here you create new dimensions for the InfoCube, then put each characteristics to corresponding dimension.
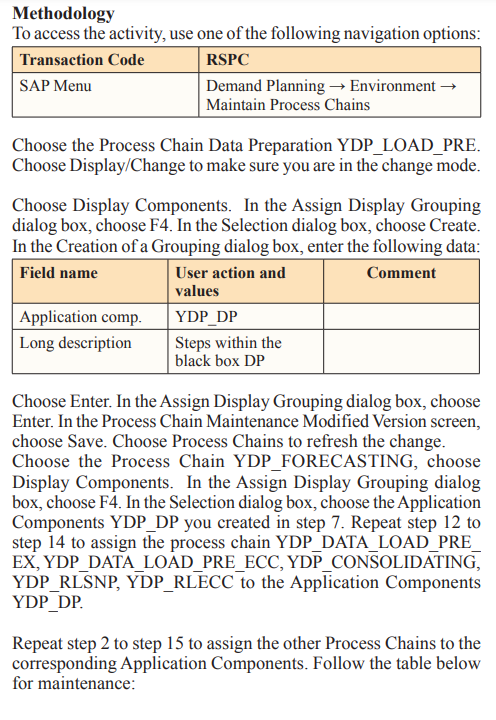
To access the activity, use one of the following navigation options:

In the Data Warehousing Workbench: Modeling window, choose InfoProvider from the Modeling section, expand InfoArea ZBPR_ Y93_DPA_IA01 and choose InfoCube ZY93_IC02.
Go to change mode and select the folder Dimensions Folder at the right side of the screen. Right-click dimension ZY93_IC021 and choose Properties. Change the description to Product and confirm.
Right-click dimension ZY93_IC02T and choose Change Description. Change the description to Time and confirm. Right- click the folder Dimension and choose Create New Dimensions Choose Save.
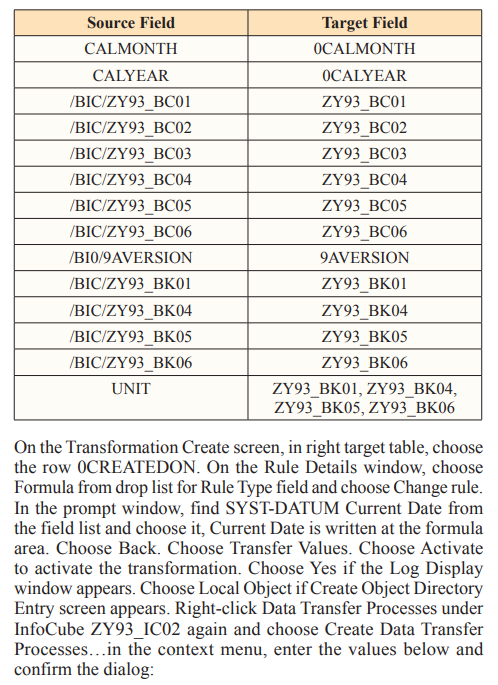
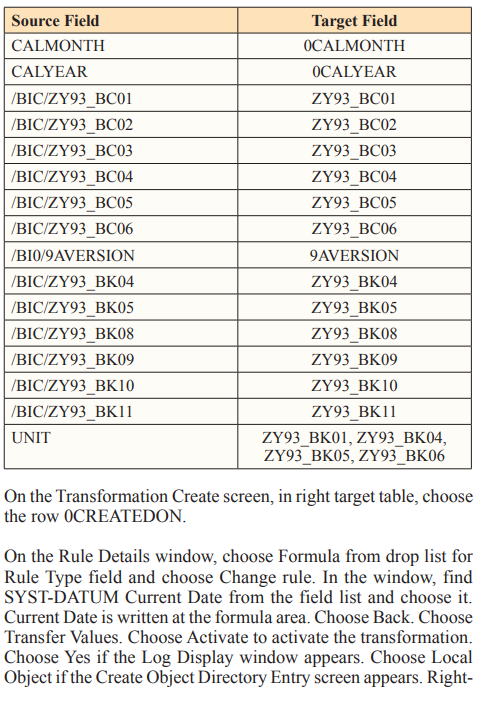
Follow the table below to add the characteristics to the corresponding dimensions by drag and drop:
Right-click dimension Created on and choose InfoObject Direct Input. Insert the following values, and choose enter. Select the folder Key Figures and remove all key figures that are not part of the DataSource YDP_PA_DS01.
Choose Activate to activate the InfoCube. Choose Local Object if the Create Object Directory Entry dialog box appears. Create Transformation, DTP and InfoPackage. To access the activity, use one of the following navigation options:
In the left part of the Administrator Workbench: Modeling window, in the Modeling section, choose Source System.
Right-click your Source system, for example, Sh4CLNT185, choose Replicate DataSource in the context menu. Select the as DataSource(RSDS) radio button if the Data Source from Source System Unknown dialog box appears. A background job is triggered. Check in the job overview that this job has finished before proceeding to the next step.
In the Administrator Workbench screen, you are still in the source system view. Right-click the source system Sh4CLNT185 and choose Display DataSources Tree in the context menu.
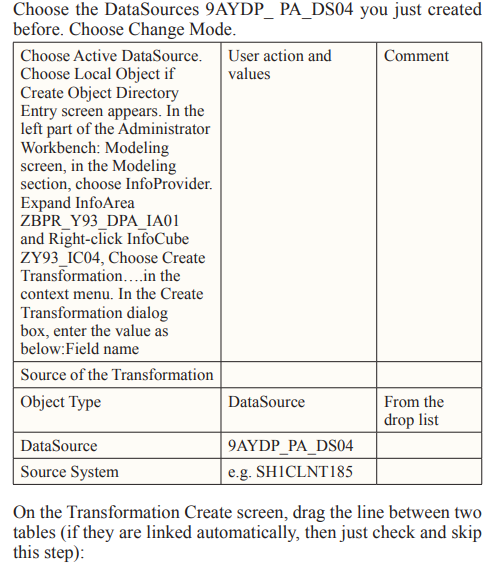
Choose the DataSources 9AYDP_ PA_DS01 you have just created. Choose Change Mode.
Choose Active DataSource. Choose Local Object if the Create Object Directory Entry screen appears. In the left part of the Administrator Workbench: Modeling screen, in the Modeling section, choose InfoProvider.
Expand InfoArea ZBPR_Y93_DPA_IA01 and right-click InfoCube ZY93_IC02, choose Create Transformation….in the context menu.
In the Create Transformation dialog box, enter the value as below: Choose Start Transformation.
On the Transformation Create screen, drag the line between two tables (if they are linked automatically, then just check and skip this step):


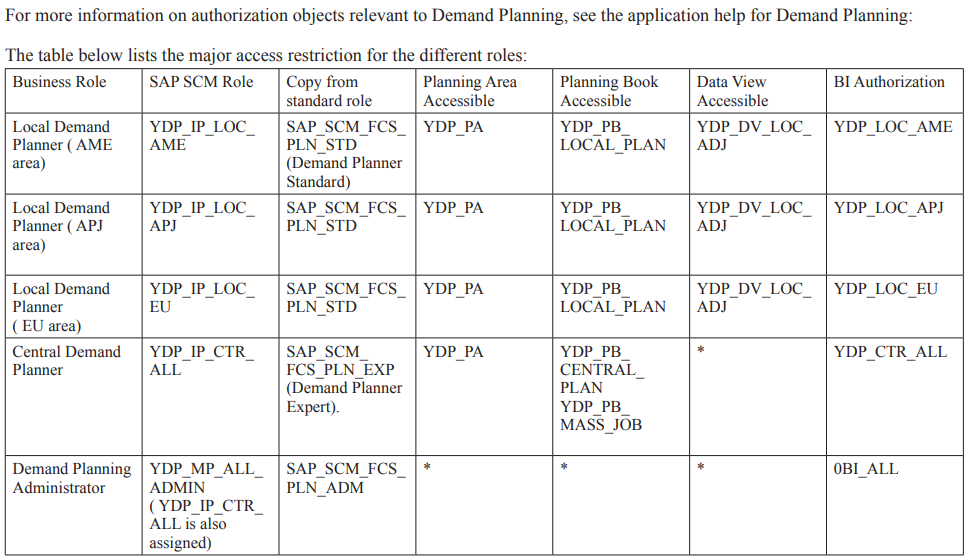
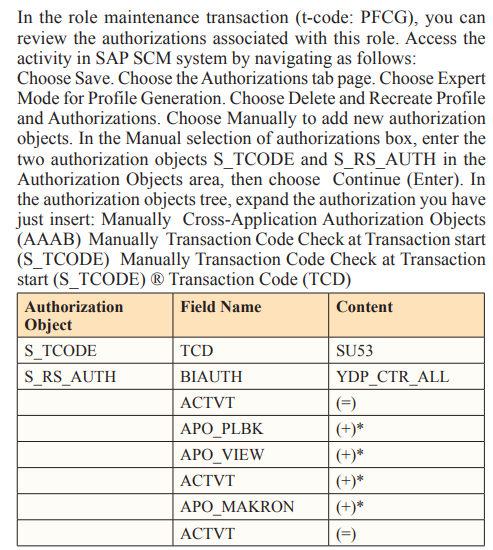
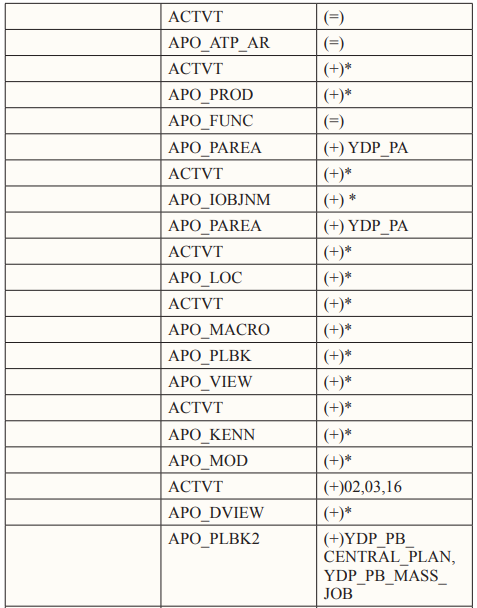
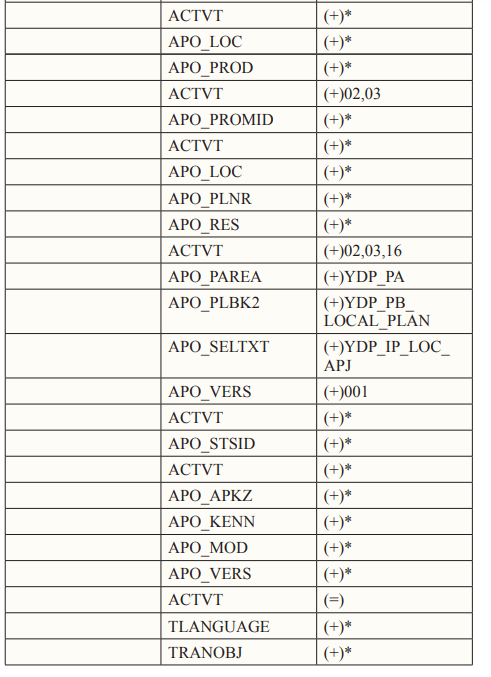

Generated all the authorization profiles needed for the scenario
Creating SAP SCM Users and Assign Proper Roles
You create four users here for different business role users. The access authorization is controlled by assigning different roles to each user.
You need to assign the default planning book to each DP user. When a planner opens the demand planning desktop, he or she sees the planning book assigned to them. Note that you can assign only one planning book to a user.
You can restrict the users’ authorization so that they can only navigate to a specified planning book or a specific data view.
To access the activity, use one of the following navigation options: Choose New Entries.
Change the following two lines, the first without the transaction code as shown in the table:
If you set an indicator in the Specific book column, the user whose name you have entered in the left column can only navigate to the specified planning book in interactive demand planning (the user can access all the data views for this planning book).
If you set an indicator in the Specific View column, the user you have entered in the left column can use this planning book and the planning view only and cannot navigate to other planning books and views in the interactive demand planning.
To restrict a person’s authorization (for example, for a local planner), so that they can only use planning book YDP_PB_ LOCAL_PLAN and data view YDP_DV_LOC_ADJ, you have to maintain the table as follows:
In this article able to describe few case studies, methodologies and results related to Process flow, Bucket Profile in Demand Planning, Planning Area, Planning Book and Data View and Forecasting. SAP Supply Chain Management, Demand planning, Forecasting will have more number of case studies and methodologies. We’ll cover few more in next article [1-25].